Real Flow 4 - Large Spill Production Techniques
Introduction
This is less of a tutorial and more of a brain dump of some of the things I have learned over the past couple of weeks working on the large spill project. It coveres what I have come to think of as some production ready techniques for gettings bits and pieces of a large spill up and running.
Production Techniques
By production techniques I basically mean a couple of things:
- Efficient - They must be efficient! This means different things in different contexts, but it basically means fast/cheap when you can. No huge sims just because you can, only what you need, etc, etc.
- Directable - The most physically accurate sim in the world is no good if your VFX supervisor, art director or director want the whole thing to look different. If it was just a matter of being physically accurate you could just scale the scene right, use the default fluid settings, and set the resolution as high as you dare. I tried this, and of course it worked, but it was not the look that I wanted as I'll explain below.
- Pipeline Friendly - Realflow is great at handling particles.. millions of em if you want. However, those particles have to move through the whole pipeline and end up as pixels integrated into a scene. For me this means RealFlow particles get meshed and exported into maya, then rendered, then composited in Shake. It's no good to generate 1million spray particels in RealFlow (it will handle this easily, albiet slowly) when Maya chokes.
- Scalable - This is a tough one as the fluid behaviour does change with increases in resolution.. but a key thing is being able to try LOTS of variations. I rather get 10 1-day sims than 1 10-day sim. Odds are that one of those 10 1-day sims will look better than that 1 10-day sim. There are a lot of variables to fine tune and the more sims you can turn over, the better your final product. This means testing small when possible and scaling up when you found the right settings.
So that is basically my thoughts on production ready....
Large Spill
For my large spill I have an alley (about 8 meters across) with buildings enclosing either side. I want the water to run down the alley, pickup some trashcans, and run them into the camera. The water should be large, and massive, and menacing. My vision is a sort of monolithic body of water traveling with an almost purpose. I get to choose the direction for this shot, and this is what I decided. There were times I was tempted to go with another look that I found in my explorations (perhaps more splashy, quick, and violent), but I keep trying to get my original vision.
General Method
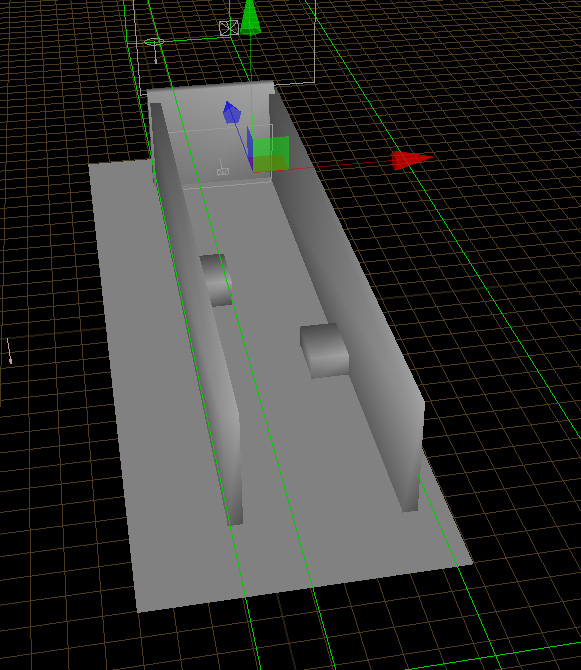
In keeping with my idea to get lots of simulations done to nail down the settings I wanted and later to troubleshoot scripts, I decided to setup a small test scene with which I could test various things. A picture of it is below:
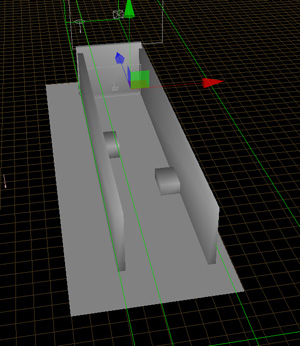
It's a bit smaller than my actual set, so it sims a bit faster, but it is close enough that the settings can be used on the full size model. To save time water is generated right at the end of the alley. In my real model the water makes a sort of turn into the alley, but this lets me see the behaviour easier. It's got two cubes for the water to flow around. I use this for all my tests at low res and then try a low res on my real set and then a high res. Be sure to setup a volume daemon.
My goal for high res sim is no more than 12 hours. I can get a good sim with 2m particles in this time, and I can do it overnight! I try to get one going almost every night. The more the better! I save preview movies of each and record the settings so I can see where I have been and can go back if need be.
Optimization Hints
Here are a few things I've learned to make sims faster.
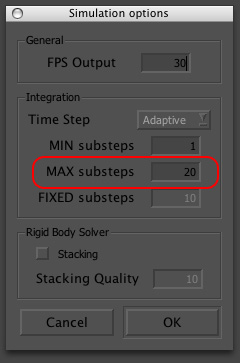 Turn down simulation steps This is the most important. 333 is the default, I usually use no more than 40, and can often get away with 20. This has a direct impact on the speed of each frame. Set it as low as you can.. you'll know it is too low if your water explodes (simulation becomes unstable) or if water leaks excessively through objects.
If your simulation explodes.. before you crank up the steps, try lowering the internal/external pressure. They work together so most of the time 1 internal and 1 external is going to be similar to 100 internal and 100 external, but 1/1 will simulate faster. You can not always do this, as high pressures are sometimes needed, but the lower the fewer simulation steps you need so give it a try.
If your simulation leaks... Some leakage is a-okay! Just bound your scene with a volume daemon. Getting rid of all leakage will make it all take too long. If you are getting too much leakage, try changing the collision distance instead of turning up simulation steps. The default depends on the size of the object, but is something like .02 for a new cube which is .02 meters or .79 inches. Less than an Inch! For large scale simulations this is very small.. even .04 might allow you to get by with fewer simulation steps and that is a good thing!
Disable the viewport It's Alt D and it helps your simulations go faster. How much? I'm not sure, but it's definately more than 10%!
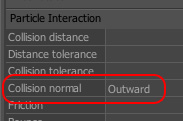 Set collision normal to outside, it's half the work for the engine and you have good normals anyway.. right?
Large Scale Water Elements
After doing some research to figure out how other people approached this, I came up the mix of potential elements I might use to make my spill happen.
Water Mass
This is the main body of water. I want it interesting, but controlled, it should stay as a covesive whole with a large front that moves fairly cohesively. A wall of water if you will. This will be fluid particles, of course, and will be meshed and rendered as liquid water of some sort.
Collision Spray
Dumb particle spray generated on collision with objects. It does not interact with the water mass, but does bounce off of other solid objects. This should also be generated at the front of the water mass to help hide it's edges. Loaded as particles in maya and probably rendered as multi-points.
Foam
Liquid particles that interact with the water mass. They float on top, they lead, they surround. I figure this will help with a sense of scale. Probably loaded into maya and rendered as clouds.
Rigid Bodies
Gotta have stuff in the water! In my case, the trash cans. To make things tricky, I want them to hit the camera.
Debris
It would be great to have other stuff in the water too. Cups, boxes, shoes.. you know.. city stuff. Basially low res poly objects that (ideally) flow along with the water being exposed and sucked under as the water moves.
Water Mass
So I want this big mass of water. My initial tests with the default 'water' settings were a bit dissapointing. It looked okay, but there was a lot of splashing and the water tended to spread out instead of forming a sort of wall.
Simulation Settings
Here is what worked for me and I think are good general guides for larger masses of water.
- Higher FPS - If you are going for a playback speed of 24fps, try simulating at 30, or even 35 fps. It will make the scale seem larger when played back at 24fps
- Higher Viscocity - I ended up somewhere around 6-7. Some of this was because I wanted a cohesive mass, YMMV.
- Higher Density - I like 1250... It slowes down the water, makes it a bit more cohesive. It's like water with lots of dirt and such in it. Just a but thicker.
- Internal/External Pressure - After much finegaling.. I ended up with 1 internal and 0.5 external. It does not make much of a difference in my sims for this project. 1 and 1 worked, 0.5 and 0.5 worked, I just settled on 1 and 0.5
- Surface Tension - 1 worked well for me to the water more cohesive. I'll use other things for spray.
- Higher gravity - I ended up around 40
- Drag daemon - Set with shield turned on, and 0.05 to 0.1 for the force. This helps hold back the front of the water so it builds up, rather than spreading out.
- High Friction on the ground - Around .1. This makes the particle sim look a bit odd, water just sort of sticks to the ground, but then new particles tumble over those, so it looks right ultimately. It works with the drag daemon to build a wall of water, rather than have the water flow outward.
Here is a quick test with these settings. Not bad, but could be better. Keep tweaking. The water does mass up, and it flows OVER the boxes, rather than splash into a spray of particles. Probably needs a bit more gravity and ground friction...
As always, try lots of tests, get the look you want, and then move on to larger/more complex runs. Once you are happy, mesh this bit and render it as appropriate. I found making it opaque works best.
Collision Spray
My basic idea was to have dumb particle spray created on collisions, have it spray around a bit, then get killed off by a age daemon. Hopefully this will form nice full areas of spray at the edges of the water and especially on collisions with objects. Since the dump particles do not need to interact with the water, this can be done AFTER the water simulation. You can get your water Mass simulation nailed, then start a new scene and load the particles into a binary loader. They will still generate collisions and spray, and it is much faster to refine how the spray works. You can jump to the middle of your simulation and start generating spray there to see how things run. This is how I do all my spray, get the water sim right, then re-load the particles via a binary loader and tune the spray.
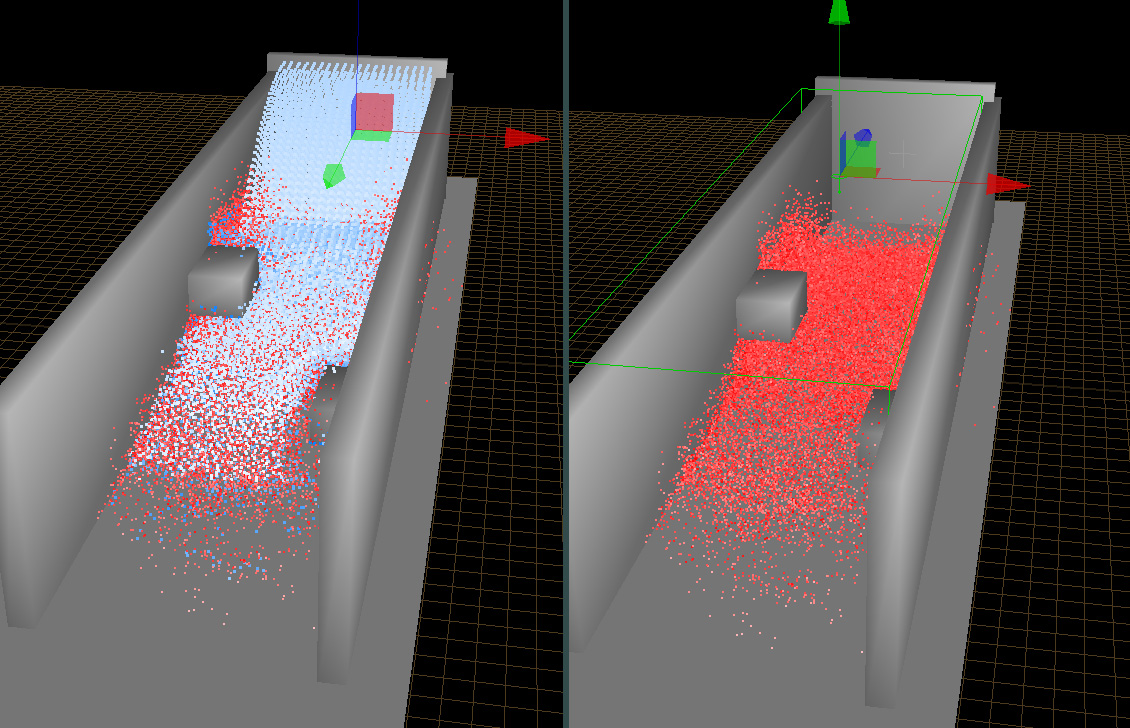
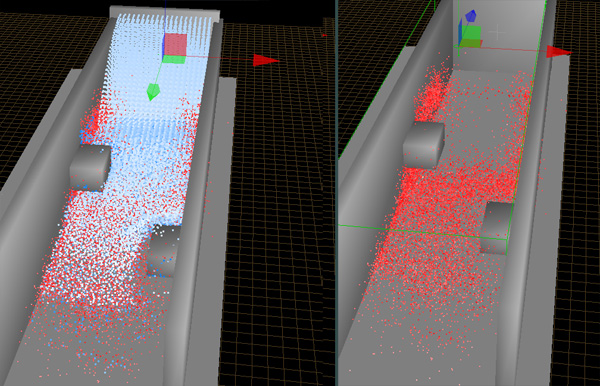
Here is perhaps where I have done the most experimentation. I tried Josh's dumb spray script, and it worked, but it generated spray for collisions based on speed. This lets you attenuate the amount of spray, but not where it shows up. If you look at the image below you can see what I mean:

On the left we have the spray and water (spray in red). Looks pretty good.. we have spray leading the water and around the edges.. Not too shabby! But look at the image on the right. This is the same simulation and frame, but with the water hidden. Look at all the spray under the water. There are 44k spray particles, but maybe only 5k that we can see (and that is optimistic). What a waste! Certainly not the production ready efficiency I was looking for.
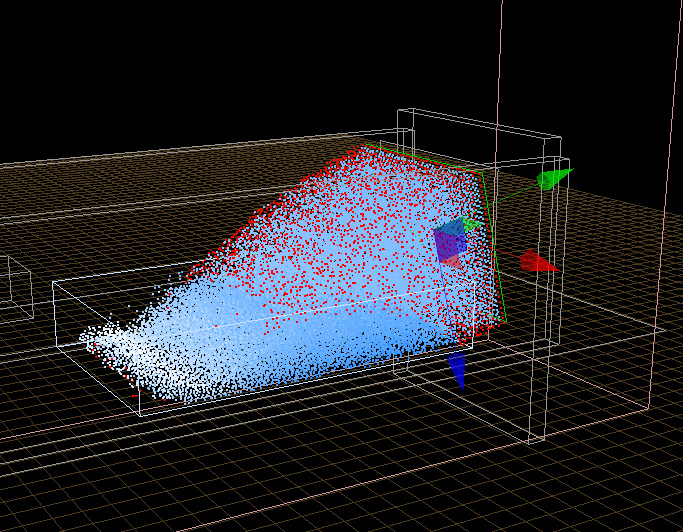
Now look at this set of images:
Now we are talking. A lot less spray overall (~1.3k), but most of it where we want it. None under the water where it is wasted. Okay, some is under the water, but you can see a large gap where spray is no longer being created under the large water mass. This is particle spray based on collisions as well, rather than checking on the speed of the particle colliding, it checks on the pressure. If the particle is deep in the water mass, it's pressure will be higher than the water near the edges. Download the script here.
Some other refinements
There needs to be more spray to really work, and I also wanted the direction/speed of the new spray to be controllable, so I added this to the script. In real use this can generate A LOT of spray, and take A LOT of time. Two things that need some management to be production worthy.
To handle the amount of spray needed, I divide the spray amongst several spray emitters. Rather than generate 20 spray particles on each collision in one spray emitter (and most importantly, one BIN file), I generate 5 in 4 different emitters. You can tune this to your needs. The idea being that Maya can handle 100,000 particles, but not 1,000,000. But you can render 10 passes at 100,000 each. You could run the script 10 times, but this is easier, and much faster. Loading the particles from disk, and iterating through the collisions takes time, creating the particles not so much. So this lets you iterate once, but get lots of seperate particle passes. As many as you like. I have gone up to 8 so far.....
To make it slightly faster you can skip x number of collisions and generate more spray per collision. This is a minor time saver, but it is there in the script if you want it.
General Setup
The short of it is this
- Simulate your water, make sure you like it
- Reload the simulation as a binary loader
- Remove the binary loader from the global links. THIS IS KEY! The script may generate dumb particles on top of the water ones, and this is very bad. They do not interact anyway, so remove the binary loader from the global section. Don't worry, it will still collide (in fact it will collide even if the original geometry is not in the scene) but if you don't remove it, real flow WILL crash.
- Setup the number of spray emitters you want. spray, sprayb, sprayc, sprayd, and so on.
- Make them dumb, and set the params. Resolution does not matter, and for density I use about half what I user for the main water.
- Set the spray emitter speed and max number of particles to 0. This prevents them from just emitting spray and limits them to script based creation.
- Add a kill by age daemon to kill off spray. I find that a lifespan of 15, with a variation of 10 (for a 5->25 range) works well.
- Paste the script into the even scripts window (Layout/evenscript) and modify the settings. They key one is the spray_pressure. This will control where spray gets generated. Set it too low, and no spray, too high and you will get spray deep in the water. The way I tune this is to set the kill age daemon to 1 frame, and pick a frame in the middle of my simulation and run a frame or two. You will immediately see where spray is being generated and you can tune the value until you find the right balance. You can also judge how many particles will be created each frame, helping you set the other values to meet your pipeline needs.
- Simulate! Be sure to set the age daemon back to something other than 1.
It's less of a recipie than a toolkit.. hack at the script and make it work for your situation.
Foam
It would be great to have some particles on top/around the water that flow with it. Like foam on top of the ocean. It needs to be liquid to interact with your water, and of lesser density so it floats. It might be nice to have it clump, so I'm thinking a high surface tension.
I'm still working on this, but here is my most recent foam script. Basically it iterates through ALL of the water particles and if they are below a certain pressure (basically on the outside of the mass) it may turn it to foam. Conversly if the pressure of a foam particle is high enough (surrounded by other foam/water) it goes back to water.
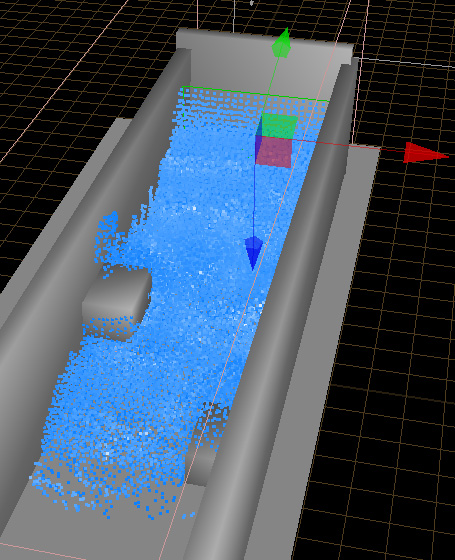
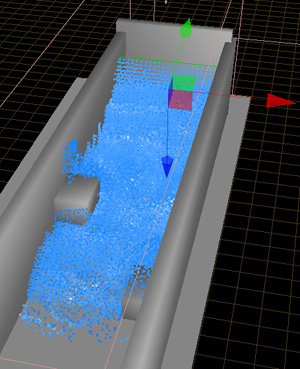
Here is a screenshot of an early test with the geometry hidden. As you can see the foam only forms/stays on the outside of the water.

Since this interacts with the water, it must be run at simulation time :-( However, you may be able to get away with a 1/2 res simulation just to get the foam. Oh, and it is SLOOOOOOW since it must iterate through every water particle.
I'm thinking it might look good as cloud shaded particles with a lot of fractal noise on them. They should flow with the water and the high surface tension should make them clump a bit.
Rigid Bodies
The main hint I have here actually comes from Victor. He's a smart guy and realized that the fluid sims with ridgid bodies take much longer. So he suggested doing a low-res sim to get the rigid body motion, saving them out, re-importing them into realflow an doing the high-res fluid sim without the rigid body interaction, just flowing around the already animated objects. It works well, saves time, and is controllable. Now that's production ready!
Debris
There are two ways to go about this. Either make the water mass mesh a surface emitter in Maya, and generate particles at a low rate using geometry instancer to make them cups, boxes, shoes, etc. They will not flow with the water however, so this has some drawbacks. A better way if you can swing it is to create another emiter along with your water emitter. Set the size very small, and the speed low enough so it only generates a few hundred particles. Make sure they are liquid so they flow along with the water and you can use these for your particle instancer. Viola, debris flowing with the water. Be suer to set the density lower so your debris bobs near the top, otherwise it's just wasted.